This is one part of a multi part tutorial on getting started with a new application.
This tutorial covers:
- downloading a starter template
- customising the template with your application's name
Decide the identifier-name of your application
In the next steps you'll create a git repository for your new app, so pick a name for your app that is valid as a directory name and valid in a URL. The convention is to use all lower case hyphen-separated-words.
E.g. forgot-password, profile, stuapp-support.
Fork the starter app
Got to the starter app repository and hit the Create Fork button,
![]() (if you're logged in to BitBucket, just click the button to the left).
(if you're logged in to BitBucket, just click the button to the left).
Our React apps all live in the "Modern Web Applications" project in BitBucket.
- change the Project option to Modern Web Applications,
- use your project name in the Name field, and
- UNcheck the "Enable fork syncing" option.
Clone and run your app immediately
Before you do any editing, you can run the starter app you just created.
First clone it to your development computer, by visiting the repo you just cloned in BitBucket and copying the git ssh URL. Paste that into a git clone command.
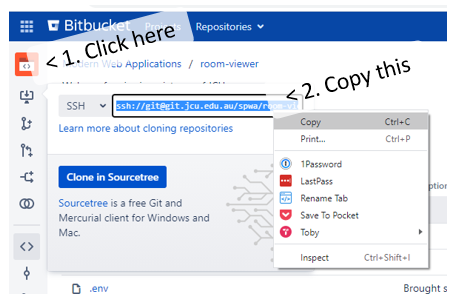
 $ git clone ssh://git@git.jcu.edu.au/~pvrdwb/tute-app.git

Cloning into 'tute-app'...
remote: Enumerating objects: 130, done.
remote: Counting objects: 100% (130/130), done.
remote: Compressing objects: 100% (121/121), done.
remote: Total 130 (delta 61), reused 0 (delta 0)
Receiving objects: 100% (130/130), 114.72 KiB | 695.00 KiB/s, done.
Resolving deltas: 100% (61/61), done.

 $ cd tute-app  # change into your app directory

 $ npm install  # install all the dependencies
 # (...many lines of output...)
npm install will run for a few minutes. Some of the dependencies come from a JCU-only server, so if it seems to hang for a while make sure you're on campus or connected to a JCU VPN. You can re-run npm install as often as you like until everything is installed.
$ npm start # run the dev server
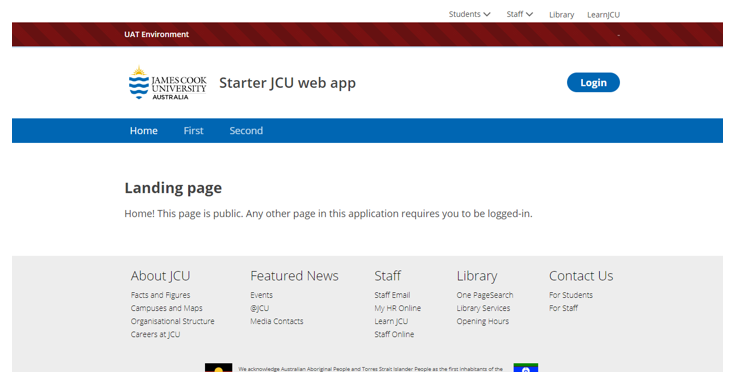
npm start will build the project and start the development server. In a minute or two a browser window should pop open showing you the sample application; if your browser doesn't automatically open, hit https://localhost:3000. Accept the warnings about the invalid certificate (on Chrome, it's ) and soon you'll be looking at a page like this:
If at this point you don't see the starter app, there is a problem that needs to be sorted out before you continue with this tutorial. Contact one of the Spark framework developers to help get it sorted out.
Add the app name
Change the sample name used in the starter app to suit your new application. This happens in four places:
Edit the .env file so REACT_APP_BASE_URL is set to your identifier-name (which will be the app's path when deployed):
REACT_APP_BASE_URL=my-new-app
Edit src/App.js and set the title prop of your <JcuApp> component. This is for humans to read, so make it normal English in title case:
title="My New Application"
Edit public/index.html to set the application's name in the <title> tag. This will show up in browser tabs for users to read, so use the same human name as in the title prop above, but add "JCU - " before the name:
<title>JCU - My New Application</title>
Edit package.json to set the name and homepage properties:
{
	"name": "my-new-app",
	"version": "0.1.0",
	"homepage": "/my-new-app",
	"private": true,
Your public/config file includes the auth identifier for your application; if you have sorted out your user authorisation already, you can add your app's auth name here. If you don't have auth yet, it's okay to leave it as testapp for now.
	"authentication": {
		"client_id": "my-new-app",
| << Previous | Next >> |
|---|---|
| Workflow, Tools and Environment | API Interfaces |